Microwave Corn on the Cob: The Ultimate Fast Track to Summer Flavor
Few things evoke the taste of summer quite like a perfectly cooked ear of corn on the cob. Its sweet, crisp kernels burst with flavor, making it an ideal side dish for any meal. However, traditional methods like boiling a large pot of water or firing up the grill can be time-consuming and often overkill for just a few ears. Enter the game-changer: **microwave corn on the cob**. This ingenious method promises perfectly cooked, juicy kernels in a fraction of the time, making it the fastest and easiest way to enjoy this seasonal favorite year-round. Imagine skipping the wait for water to boil or the hassle of grill setup. With your microwave and just a couple of minutes, you can transform fresh or even frozen corn into a delightful side. Whether you're whipping up a quick weeknight dinner, need an extra vegetable dish for a potluck, or simply craving that sweet corn taste in the dead of winter, mastering how to cook corn on the cob in the microwave is a culinary hack you won't regret.Why Microwave Corn on the Cob? The Ultimate Time-Saver
The primary appeal of **microwave corn on the cob** lies in its incredible speed and efficiency. It’s significantly faster than boiling and more convenient than grilling, especially when you're preparing just one or two ears. * Unrivaled Speed: Forget waiting for a large pot of water to come to a rolling boil. A single ear of corn can be perfectly steamed in the microwave in as little as 2-3 minutes. Even cooking up to four ears simultaneously will take only slightly longer, still beating traditional methods by a mile. * Energy Efficient: Heating a small appliance for a few minutes consumes far less energy than boiling a large pot of water on a stovetop burner for an extended period. * Hands-Off Cooking: Once the corn is in the microwave, your hands are free to focus on your main dish, reducing kitchen stress and multi-tasking efforts. * Minimal Cleanup: No greasy grill grates or starchy pots to scrub. Depending on your chosen method, cleanup can be as simple as discarding a husk or a damp paper towel. * Preserves Nutrients and Flavor: Microwaving uses steam generated from the corn's own moisture, which helps to retain more of its natural sweetness and nutrients compared to boiling, where water-soluble vitamins can leach out into the cooking water. While boiling and grilling have their merits, particularly for large gatherings or when a smoky char is desired, microwaving is the clear winner for everyday convenience and delicious results. Microwaving corn on the cob offers unparalleled convenience, allowing you to cook perfect corn on the cob in minutes with your microwave, ensuring a delicious side dish with minimal fuss.Mastering Microwave Corn: Two Simple Methods for Perfection
There are two primary ways to prepare **microwave corn on the cob**, each offering unique advantages. Both methods leverage the microwave's ability to quickly create steam, resulting in tender, juicy kernels every time.Method 1: Microwaving Corn in the Husk (The "Lazy Genius" Way)
This is arguably the easiest and most hands-off method, as the husk acts as a natural steaming pouch, locking in moisture and flavor. Plus, it makes shucking surprisingly simple post-cooking!- No Prep Required: Simply place the entire ear of corn, husk and all, directly into your microwave. No need to wet anything or wrap it.
- Cook: For a single medium ear of corn, microwave on high for 3 minutes. If cooking two ears, increase to 5-6 minutes. For three or four ears, aim for 7-8 minutes. Keep in mind that microwave wattages vary, so you might need to adjust slightly.
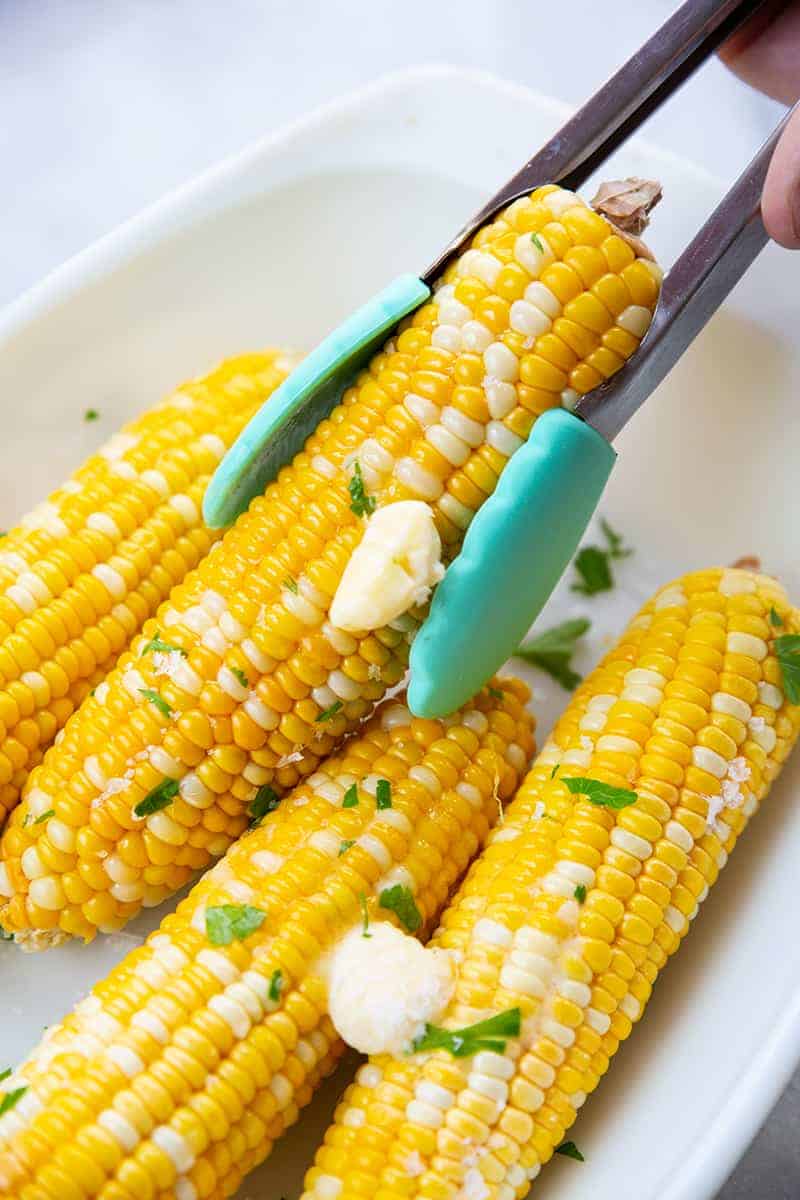
- Rest and Cool: This step is crucial. Once cooked, carefully remove the hot corn from the microwave (use tongs or an oven mitt). Let it rest on a plate for 2-3 minutes. This allows the internal steaming to complete and makes handling much safer.
- Easy Shuck: Once cool enough to handle, grasp the stem end of the ear. Using a sharp knife, carefully slice off the very bottom (about an inch) of the ear. Then, simply hold the top of the ear and squeeze downwards from the cut end. The steamed husk and silk should slide right off, leaving you with a perfectly clean, cooked ear of corn. This technique is a game-changer for effortless shucking!
Pros: Excellent moisture retention, minimal direct handling of raw corn, incredibly easy shucking post-cook. Cons: Requires a short cooling period before eating.
Method 2: Microwaving Shucked Corn (Wrapped in a Damp Paper Towel)
This method is ideal if you've already shucked your corn (perhaps you bought it pre-shucked or prefer to clean it right away) or if you want to eat it immediately without the cooling and shucking step.- Prep the Corn: First, remove the husk and silk from each ear of corn. Rinse the corn under cold water to remove any lingering silk strands.
- Damp Wrap: Take a paper towel and thoroughly wet it under the faucet, then wring out any excess water until it's just damp, not dripping. Tightly wrap each shucked ear of corn individually in a damp paper towel. The damp towel mimics the natural husk, creating a steamy environment.
- Cook: Place the wrapped ear(s) in the microwave. For one ear, microwave on high for 2-3 minutes. For two ears, try 4-5 minutes. Adjust cooking time based on the size of the corn and your microwave's power.
- Serve Immediately: Carefully unwrap the hot corn (it will be steamy!) and serve with your favorite seasonings. No further shucking or extensive cooling is needed, though a moment to cool can prevent burnt fingers.
Pros: Ready to eat almost instantly, no post-cook shucking, good for pre-shucked corn. Cons: Requires the extra step of preparing and wrapping each ear.
Whether you prefer the 'no-shuck' convenience of cooking it in its natural wrapper or the quick appeal of preparing it pre-shucked, learning how to microwave corn on the cob with or without the husk will guarantee juicy results every time.
Pro Tips for the Juiciest Microwave Corn on the Cob
- Choose Fresh Corn: The quality of your raw ingredients significantly impacts the final taste. Look for corn with bright green husks, moist (not dry or brittle) silk, and firm, plump kernels when gently squeezed. The fresher the corn, the sweeter it will be.
- Don't Overcrowd: For optimal and even cooking, avoid piling too many ears into the microwave at once. Aim for no more than four ears at a time, arranged in a single layer if possible. Overcrowding can lead to uneven cooking and longer total times.
- Know Your Microwave's Power: Microwave wattages vary widely (from 700 to 1200+ watts). A lower wattage microwave will require slightly longer cooking times. It’s always best to start with the lower end of the recommended time and add 30-60 second increments until desired tenderness is achieved.
- Always Allow Resting Time: For both methods, a brief rest after cooking is essential. This allows the internal steam to redistribute and finish cooking the kernels evenly, ensuring a consistent texture throughout the ear. It also makes the corn safer to handle.
- Seasoning is Key: Once cooked, slather your corn with butter, sprinkle with salt and black pepper, or get creative! Try chili-lime seasoning, smoked paprika, grated Parmesan cheese, fresh herbs like cilantro or parsley, or a drizzle of hot sauce for an extra kick.
- Freezing for Year-Round Enjoyment: You can absolutely enjoy sweet summer corn even in winter! Many people freeze raw corn on the cob right in their plastic bags. To cook from frozen, simply place the frozen ear (in its husk, if applicable) in the microwave and add 1-2 minutes to the standard cooking time. The microwave is perfect for bringing that taste of summer back to life from the freezer.
Microwave vs. Traditional: When to Choose Which Method
While microwaving is undeniably fast and convenient, understanding its place alongside other cooking methods can help you choose the best option for every occasion. * Choose Microwaving When:- You need a quick side dish for a busy weeknight.
- You're only cooking 1-4 ears of corn.
- You want to avoid heating up your kitchen.
- You need to free up your stovetop or grill for other dishes.
- You prefer easy cleanup.
- You're cooking a large batch (more than 4-6 ears) for a crowd.
- You prefer a softer, slightly more "blanched" texture.
- You don't mind waiting for a large pot of water to boil.
- You want a smoky flavor and slightly charred kernels.
- You're already firing up the grill for other foods.
- You enjoy the outdoor cooking experience.
